Chiller Maintenance: Protect Your Investment
Your chiller is the most expensive part of your setup. Learn how to clean, descale, and maintain it for years of reliable cooling.
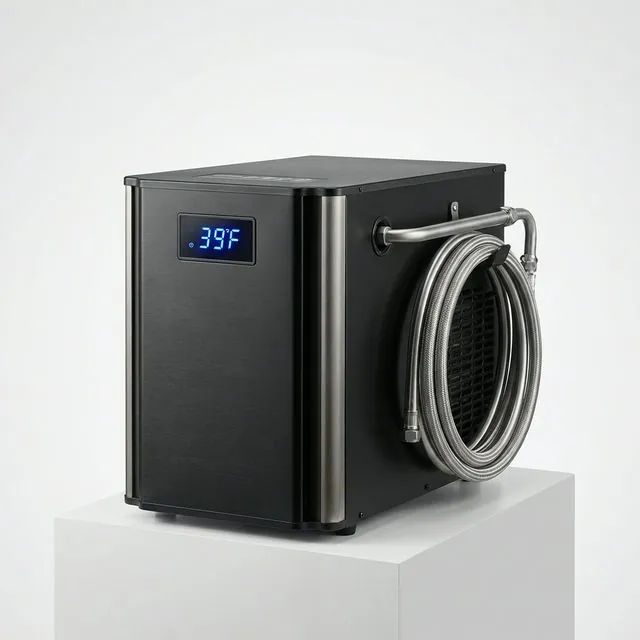
A well-maintained chiller can last 10+ years. Neglect leads to compressor failure and decreased efficiency — and because the chiller is usually the most expensive component in the whole setup, maintenance here has the best return of any chore in cold plunging. Pair it with solid water care, better cold plunge insulation, and accurate temperature control systems so the unit is not working harder than necessary. If you are still choosing a platform, a stock tank cold plunge is the simplest way to run an external chiller.
The good news: none of this is technical. A chiller is a compressor, two heat exchangers, a fan, and a pump loop. Keep air flowing over one side and clean water flowing through the other, and the machine mostly takes care of itself.
How a Chiller Fails (and What Prevents It)
Almost every premature chiller death follows the same script. Dust blocks the air side or scale coats the water side, the compressor runs longer and hotter to hit the same setpoint, and months of that extra load finish it. You will usually get warnings first:
- Longer run times to reach the same temperature — the earliest and most reliable signal
- Weaker water flow from the outlet, pointing at a clogged filter or scaled exchanger
- The unit feels hotter than it used to, or the fan runs constantly
- Short-cycling — rapid on/off switching, often a probe or airflow problem rather than a fatal one
Catch any of these early and the fix is typically a cleaning session, not a repair bill.
Key Maintenance Tasks
- Air filter cleaning: Vacuum or wash the dust filters on the air intake monthly, especially on outdoor setups that also need seasonal winterizing. A clogged intake is the single most common cause of weak cooling — the compressor cannot reject heat through a felt of dust and cottonwood fluff.
- Coil cleaning: Use compressed air to blow out dust from the internal cooling fins once per season to keep cooling performance aligned with your temperature control settings. Blow from the inside out where possible, and be gentle — bent fins block airflow as effectively as dirt.
- Flushing the system: Run a mixture of water and white vinegar through the chiller for 30 minutes annually to remove calcium buildup and scaling, then flush thoroughly with fresh water. This matters most if your water is hard or your sanitation routine is light or inconsistent, so review your water maintenance schedule. Scale on the heat exchanger acts as insulation exactly where you don't want it.
- Leak inspection: Check all hose connections and internal fittings for signs of moisture, and confirm your cords, outlets, and GFCI protection still match basic cold plunge safety protocols. Tighten unions hand-tight plus a quarter turn; cracking from over-tightening causes more leaks than loosening does.
- Inline water filter: If your chiller has its own filter cartridge or screen, rinse it every couple of weeks with regular use. It is the first defense against the biofilm and debris that a plunge loop inevitably collects — see our biofilm guide for what you are keeping out.
A Realistic Schedule
- Every 2 weeks: Rinse the inline water filter; glance at connections for moisture.
- Monthly: Clean the air intake filter; wipe down the housing and clear debris from around the unit.
- Each season: Blow out the condenser coils; verify the temperature probe against a separate thermometer.
- Annually: Vinegar flush; full inspection of hoses, unions, and electrical.
Total time is about two hours a season — cheap insurance on the priciest box in your setup.
Placement Is Maintenance Too
Half of chiller care is deciding where it lives. Give it several inches of clearance on every vented side, shade if you can get it, and a stable surface that does not collect standing water. Do not seal it into an airtight cabinet — a chiller's entire job is moving heat into the surrounding air, and an enclosed unit recirculates its own exhaust until the compressor overheats. If it must live in a box (as in a wooden frame build), ventilate generously on two sides.
Helpful Add-Ons
A backup thermometer from our cold plunge accessories guide makes it easy to catch probe drift before it turns into short-cycling or poor recovery temperatures. A cheap hose-end pre-filter during fills also keeps sediment out of the loop from day one, and a smart plug with energy monitoring gives you an early-warning trendline: if watt-hours per day creep up while the weather hasn't changed, something needs cleaning. Our electricity cost breakdown shows what normal consumption looks like.
Winter Storage
If your chiller is not rated for freezing temperatures, it MUST be drained completely and stored indoors during winter months — residual water expanding inside the heat exchanger is a death sentence for the unit, and it is not a warranty claim. Before shutdown, review your winterizing checklist, sanitize the loop with your normal water care guide, and confirm the restart plan still follows basic cold plunge safety protocols. In spring, inspect the filter and connections before the first run, and let the unit sit upright for a few hours before powering on if it was moved on its side.
When to Repair vs Replace
A failed pump, probe, or fan on a quality unit is usually worth fixing. A failed compressor on an out-of-warranty budget chiller usually is not — compressor replacement approaches the cost of a new unit. If you are facing that math, our chiller reviews cover the current field, and this time put the two hours a season in the calendar.
Sources
Maintenance Equipment
Amazon Basics Hydrogen Peroxide 3%
For descaling chiller heat exchangers and removing mineral buildup.
JNW 7-in-1 Water Test Strips
Quick testing for pH, chlorine, and water quality during maintenance.
You Might Also Like
Wooden Frame Cold Plunge: Build Your Own Luxury Tub
Build a custom cedar-framed cold plunge with a waterproof liner, integrated chilling, and a premium look that suits permanent backyard setups.
Advanced Temperature Control for DIY Cold Plunges
Upgrade your DIY cold plunge with digital thermostats, smart controls, cooling schedules, and operating-cost controls that improve consistency.
Stock Tank Cold Plunge: 2-Hour Build Under $400 (2026)
Build a durable cold plunge with a galvanized stock tank, external chiller, and basic plumbing in one of the easiest DIY setups for beginners.
Best Cold Plunge Tubs for 2026
Our top-rated cold plunge tubs after hands-on testing.