DIY Cold Plunge Guide: 6 Budget Builds Under $1,000 (2026)
Compare 6 DIY cold plunge builds side by side, from $150 inflatable setups to permanent concrete tubs, to match your budget, skills, and space.
Quick Answer: Which DIY Method Is Right for You?
If you want the cheapest build with built-in cooling, go with a chest freezer conversion for $400-$800. If you want the easiest build with the least hassle, a stock tank with a chiller takes 2 hours and requires no waterproofing. If you are on a tight budget and just want to try cold plunging, an inflatable cold plunge setup gets you started for under $200.
All six methods in this guide cost under $1,000 and deliver water temperatures cold enough for real recovery benefits. The differences come down to build complexity, durability, portability, and ongoing costs. This guide walks you through every option so you can pick the best fit.
Why Build Your Own Cold Plunge?
Commercial cold plunge tubs with integrated chillers cost $4,000-$10,000. A quality DIY setup delivers 90% of the same experience for $200-$800. Here is why thousands of people build their own:
- Cost savings of 80-95% compared to commercial units
- Full control over temperature, filtration, and sanitization
- Customizable to your space, body size, and budget
- Repairable with off-the-shelf parts instead of proprietary replacements
- Educational -- you will understand exactly how cold therapy equipment works
The trade-offs are build time, aesthetics, and convenience. A commercial unit looks polished and works out of the box. A DIY build requires a weekend of work and some ongoing tinkering. For most people, the savings are worth it.
If you decide you want the commercial route instead, see our best cold plunge tubs roundup.
Complete DIY Method Comparison
This is the side-by-side comparison of all six build methods. Use this table to narrow down your options before reading the detailed guide for each method.
| Method | Total Cost | Build Time | Difficulty | Built-In Cooling | Portability | Durability | Best For |
|---|---|---|---|---|---|---|---|
| Chest Freezer | $400-$800 | 1 weekend | Medium | Yes (compressor) | Low | 3-5 years | Best value with cooling included |
| Stock Tank | $400-$700 | 2-3 hours | Easy | No (needs chiller) | Medium | 10-20 years | Easiest build, most durable |
| Inflatable Cold Plunge Setup | $150-$400 | 1 hour | Easy | No (ice or chiller) | High | 1-3 years | Renters, travel, budget testing |
| Wooden Frame | $600-$1,200 | 2-3 weekends | Hard | No (needs chiller) | Low | 10-15 years | Premium look, custom sizing |
| Concrete Block | $500-$1,000 | 1-2 weeks | Hard | No (needs chiller) | None | 20+ years | Permanent outdoor installation |
| Hot Tub Conversion | $300-$800 | 1 weekend | Medium | No (needs chiller) | None | 5-15 years | Repurposing an existing hot tub |
How to Choose: Decision Guide
Pick by Budget
Under $300 (Starter Tier)
- Inflatable cold plunge setup + ice is your only option at this price point. It works well for testing whether cold plunging is for you before investing more.
- Ongoing cost: $10-$20/week in ice if you plunge daily.
$300-$600 (Sweet Spot Tier)
- Chest freezer conversion is the clear winner here. For $400-$600, you get a setup with built-in cooling and no ongoing ice costs. Electricity runs $15-$30/month.
- A stock tank at the lower end with a budget chiller also falls in this range.
$600-$1,000 (Premium DIY Tier)
- Stock tank + 1 HP chiller gives you fast cool-down and easy maintenance.
- Wooden frame build delivers a luxury look with custom sizing.
- Concrete block is a permanent, high-value-add project for homeowners.
Pick by Difficulty
Easy (No Prior Experience Needed)
- Inflatable cold plunge setup: Inflate, fill, add ice. Done.
- Stock tank: Position, connect pump and chiller with hose clamps. No modifications to the tank itself.
Medium (Basic DIY Skills)
- Chest freezer: Requires sealing interior seams and setting up a temperature controller. Straightforward but detail-oriented.
- Hot tub conversion: Requires understanding existing plumbing and swapping/adding a chiller. Moderate mechanical work.
Hard (Experienced DIYer)
- Wooden frame: Carpentry skills, waterproof liner installation, and custom plumbing.
- Concrete block: Masonry, waterproofing, and drainage planning. Typically 1-2 weeks of work.
Pick by Living Situation
- Renting / apartment: Inflatable tub is the only practical option. Portable, storable, no modifications needed.
- House with small patio: Stock tank or chest freezer. Both fit in a 5x3 ft footprint.
- House with large yard: Any method works. Concrete block and wooden frame become viable since you have space for a permanent build.
- Have an unused hot tub: Hot tub conversion is the obvious choice. You already have the vessel, plumbing, and electrical.
Detailed Method Overviews
1. Chest Freezer Conversion
The most popular DIY method and the best value when you factor in that the freezer's compressor handles all the cooling. You seal the interior seams with marine sealant, add an Inkbird ITC-308 temperature controller to prevent freezing, and plug it in.
Pros: Cheapest way to get a chiller-grade setup. Excellent insulation built into the walls. Holds 38-60°F reliably.
Cons: No drain (you need a submersible pump to empty it). Interior seams must be waterproofed. Electrical safety requires a GFCI and the habit of unplugging before each session. Lifespan of 3-5 years before the compressor or liner may need replacement.
Read the full chest freezer build guide
2. Stock Tank
The easiest build with the longest lifespan. Galvanized steel stock tanks are designed to hold water and last decades. The trade-off is that you need a separate water chiller, which adds $250-$700 to the cost.
Pros: Built-in drain plug. No waterproofing needed. Extremely durable (10-20 years). More interior space than a chest freezer. Looks great on a patio.
Cons: Requires an external chiller (no built-in cooling). Galvanized metal can rust over many years if water chemistry is neglected. Not insulated -- you will want to add external insulation to save on energy costs.
Read the full stock tank build guide
3. Inflatable Tub
The fastest, cheapest way to start cold plunging. Buy a portable ice bath tub or a large inflatable pool, add ice, and you are in the water. Some inflatable tubs are specifically designed for cold plunging with insulated walls and drain valves.
Pros: Cheapest entry point ($50-$200 for the tub). Extremely portable -- deflates for storage or travel. No tools or modifications needed. Great for testing if you like cold plunging before committing to a permanent build.
Cons: Requires ice for every session unless paired with a chiller. Thin walls lose cold quickly. Durability is limited (1-3 years typical). Smaller interior space than other methods.
Read the full inflatable cold plunge guide
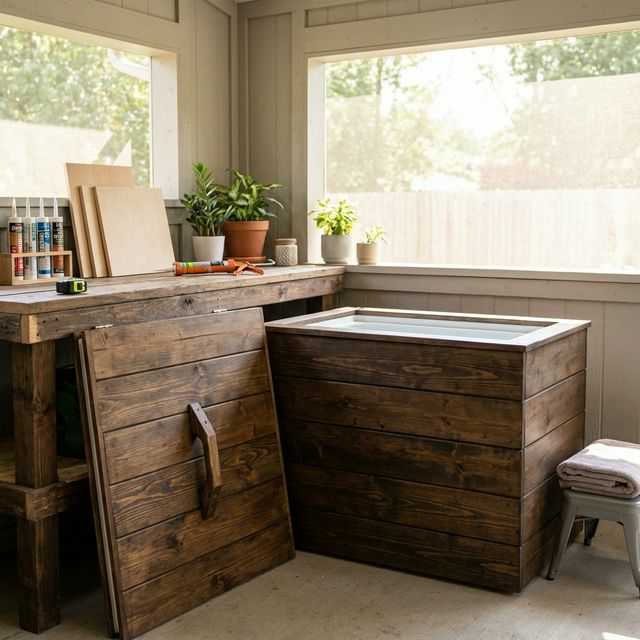
4. Wooden Frame Build
A custom wooden cold plunge is the most visually impressive DIY option. You build a cedar or treated lumber frame, install a waterproof pond liner inside, and connect an external chiller. The result looks like a high-end commercial tub.
Pros: Premium aesthetics -- looks like a $5,000+ commercial tub. Fully customizable dimensions. Cedar wood naturally resists rot and adds a pleasant scent. Can be built to match existing deck or patio furniture.
Cons: Requires carpentry skills and tools. Most expensive DIY method ($600-$1,200). Liner punctures can cause leaks. Build time is 2-3 weekends.
Read the full wooden cold plunge build guide
5. Concrete Block Build
A permanent outdoor cold plunge built from CMU (concrete masonry units), waterproofed with a pond liner or applied waterproofing membrane, and plumbed with permanent drainage. This is the most durable and long-lasting DIY option.
Pros: Lasts 20+ years. Adds property value. Completely customizable size and depth. Can be built in-ground or above-ground. Excellent thermal mass helps maintain temperature.
Cons: Permanent -- you cannot move it. Requires masonry skills or a willingness to learn. Most time-intensive build (1-2 weeks). Needs proper drainage planning and potentially a permit depending on your municipality.
Read the full concrete block cold plunge guide
6. Hot Tub Conversion
If you have an old hot tub sitting unused, converting it to a cold plunge is one of the smartest DIY moves. The vessel, plumbing, filtration, and electrical are already in place. You replace or supplement the heater with a water chiller and reconfigure the temperature controls.
Pros: Uses existing infrastructure (vessel, plumbing, jets, filtration). Often the cheapest method if you already own the tub. Built-in insulation and cover. Jets provide excellent circulation.
Cons: Only works if you have an existing hot tub. May require a high-power chiller (1+ HP) due to the larger water volume (300-500 gallons). Older tubs may have plumbing issues that need fixing first. Not portable.
Read the full hot tub conversion guide
Chiller Sizing Guide
If your chosen method requires an external chiller, selecting the right size is critical. An undersized chiller will run constantly, waste energy, and never reach your target temperature. Here is a quick reference:
- Up to 100 gallons (stock tank, inflatable): A 1/4 HP chiller is sufficient in mild climates. Budget 6-8 hours for initial cool-down.
- 100-200 gallons (large stock tank, wooden frame): A 1/2 HP to 1 HP chiller is recommended. Cool-down in 3-5 hours.
- 200-500 gallons (concrete build, hot tub conversion): A 1 HP or larger chiller is necessary. Consider a 1.5 HP unit in hot climates.
Hot climate adjustment: If your ambient temperature regularly exceeds 90°F, go one size up from the recommendation above. The chiller has to overcome both the water temperature and heat gain from the environment.
For detailed chiller comparisons with pricing and performance data, see our chiller reviews.
Maintenance Comparison
Every DIY method requires some maintenance to keep the water clean and the equipment running. Here is how they compare:
| Method | Water Changes | Sealing Maintenance | Filter Cleaning | Monthly Effort |
|---|---|---|---|---|
| Chest Freezer | Every 3-4 months | Check seams quarterly | Weekly | 1-2 hours/month |
| Stock Tank | Every 3-4 months | None (check drain plug) | Weekly | 30-60 min/month |
| Inflatable | Every 1-2 weeks | None | None (use ice) | 30 min/week |
| Wooden Frame | Every 3-4 months | Check liner annually | Weekly | 1-2 hours/month |
| Concrete Block | Every 4-6 months | Check waterproofing annually | Weekly | 1 hour/month |
| Hot Tub Conversion | Every 3-4 months | Check existing plumbing | Per existing schedule | 1-2 hours/month |
For a comprehensive guide on water care across all methods, see our water care and maintenance guide.
Frequently Asked Questions
Which DIY cold plunge method is cheapest?
An inflatable tub with ice is the cheapest to start ($50-$200 upfront). However, if you plunge daily, a chest freezer conversion ($400-$600 upfront) is cheaper long-term because it eliminates ice costs.
Can I build a cold plunge for under $500?
Yes. A chest freezer conversion averages $400-$600 total. A stock tank with a budget 1/4 HP chiller comes in around $400-$500. An inflatable tub with ice is under $200.
How cold does a DIY cold plunge get?
A chest freezer can reach 34°F (near freezing). Stock tanks and other methods with external chillers typically reach 37-45°F depending on the chiller size and ambient temperature. Ice-only methods reach 32-40°F but temperatures rise quickly.
Is a DIY cold plunge as good as a commercial one?
For water temperature and recovery benefits, yes. Commercial tubs offer better aesthetics, integrated filtration, app controls, and warranties. But the actual cold water immersion experience is identical. Our getting started guide covers how to maximize benefits regardless of your setup.
Do I need a chiller for a DIY cold plunge?
Not necessarily. A chest freezer conversion has built-in cooling. An inflatable tub can work with ice alone. But for stock tanks, wooden builds, concrete builds, and hot tub conversions, a chiller is highly recommended for consistent daily use.
What is the best DIY cold plunge for beginners?
A stock tank cold plunge is the easiest build. No waterproofing, no sealing, and the setup takes 2-3 hours. If budget is the priority, a chest freezer offers the best value. Read our beginner's cold plunge guide for safe temperature progression protocols.
How long does it take to build a DIY cold plunge?
The simplest builds (inflatable, stock tank) take 1-3 hours. A chest freezer conversion takes a weekend including cure time. Wooden frame and concrete block builds require multiple weekends. See the comparison table above for exact timeframes.
All DIY Build Guides
- DIY Chest Freezer Cold Plunge -- Best value with built-in cooling
- Stock Tank Cold Plunge -- Easiest build, most durable
- Inflatable Cold Plunge -- Budget-friendly and portable
- Wooden Frame Cold Plunge -- Premium look, custom sizing
- Concrete Block Cold Plunge -- Permanent outdoor installation
- Hot Tub Conversion -- Repurpose an existing spa
- Getting Started with Cold Plunge -- Beginner safety and temperature protocols
- Water Care & Maintenance -- Keep any setup clean and safe
Sources
DIY Build Materials
Owens Corning Foam Board Insulation
High-R-value rigid foam board for insulating DIY plunge builds. Easy to cut and waterproof.
Inkbird ITC-308 Temperature Controller
Essential thermostat controller for automating your DIY cold plunge temperature.
You Might Also Like
Wooden Frame Cold Plunge: Build Your Own Luxury Tub
Build a custom cedar-framed cold plunge with a waterproof liner, integrated chilling, and a premium look that suits permanent backyard setups.
Advanced Temperature Control for DIY Cold Plunges
Upgrade your DIY cold plunge with digital thermostats, smart controls, automation ideas, and cooling schedules that improve consistency and convenience.
Stock Tank Cold Plunge: 2-Hour Build Under $400 (2026)
Build a durable cold plunge with a galvanized stock tank, external chiller, and basic plumbing in one of the easiest DIY setups for beginners.
Best Cold Plunge Tubs for 2026
Our top-rated cold plunge tubs after hands-on testing.